Need to divide your Word document into two sections? This guide shows you two simple, effective methods: using the "Split" feature for side-by-side editing and the "Columns" feature for stylish layouts. We'll provide step-by-step instructions and compare both approaches to help you choose the best method for your needs.
Method A: The "Split" Feature – For Side-by-Side Editing
The "Split" feature is perfect for comparing drafts, reviewing edits, or working on different parts of your document simultaneously. It's quick, easy, and doesn't alter your document's underlying structure.
Steps:
Open your Document: Begin by opening the Word document you wish to split.
Navigate to the "View" Tab: Locate the "View" tab at the top of your Word window and click on it.
Activate the "Split" Command: In the "View" tab, you'll find the "Split" command (it might be represented by a button or a menu item). Click it. Your document window will instantly split horizontally into two equal sections.
Independent Editing: Now you can independently scroll and edit each half. Changes in one section won't affect the other. It's like having two separate views of the same document!
Pros and Cons:
| Pros | Cons |
|---|---|
| Incredibly fast and easy to use. | Only creates a 50/50 split; no adjustment is possible. |
| Ideal for comparing and editing. | Doesn't change the document's structure, layout or content. |
| Maintains a single file structure. | Not suitable for creating visually distinct sections in a document. |
Method B: The "Columns" Feature – For Stylish Layouts
The "Columns" feature is best for creating visually appealing layouts, such as newsletters, brochures, or documents that benefit from parallel text sections. It lets you divide your page into multiple columns, giving you more control over the visual presentation.
Steps:
Open Your Document: Open the Word document you intend to format into columns.
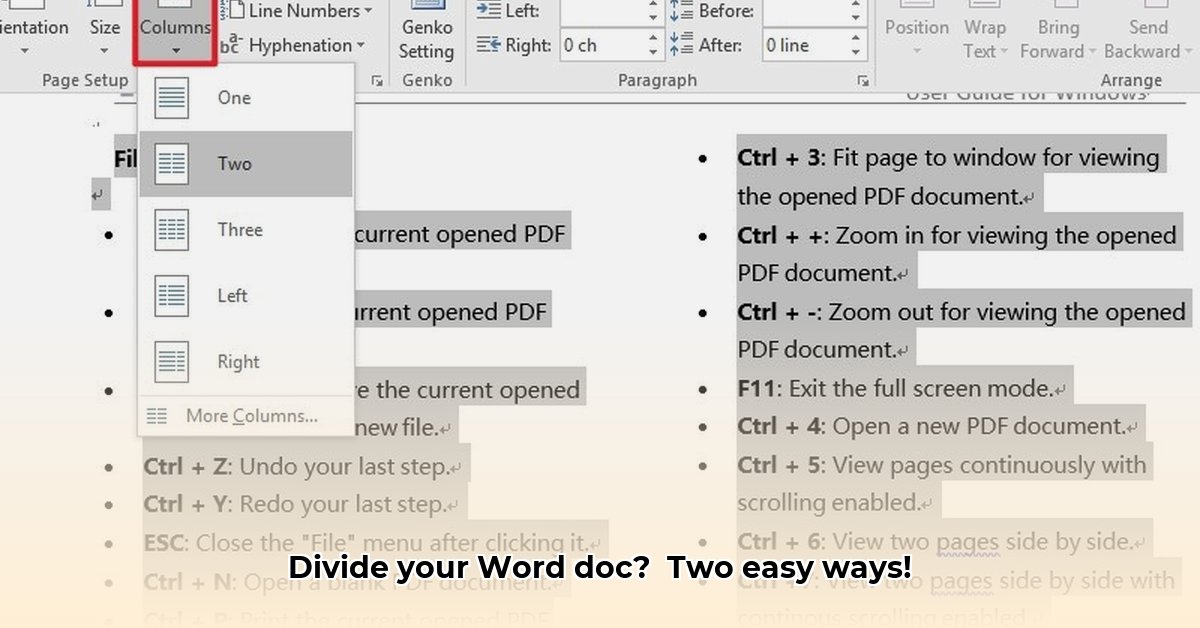
Locate the "Layout" Tab: Find and click the "Layout" tab at the top of your Word window.
Select "Columns": In the "Layout" tab, locate the "Columns" command. You'll likely see a few presets; select "Two" for a simple, even split.
Fine-tune Your Columns (Optional): For more advanced control over column width, spacing, and the addition of lines between columns, click "More Columns...". This opens a dialog box with customization options.
Pros and Cons:
| Pros | Cons |
|---|---|
| Highly customizable column widths and spacing. | Slightly more complex setup than the "Split" method. |
| Creates visually appealing multi-column layouts. | Might require additional formatting to ensure perfect alignment. |
| Versatile for various document types. | Doesn't fundamentally change the document's structure or content. |
Choosing the Right Method: A Quick Comparison
Choosing between "Split" and "Columns" depends entirely on your needs. This table summarizes their key differences:
| Feature | Split (View Tab) | Columns (Layout Tab) |
|---|---|---|
| Best Use | Simultaneous editing of a single document | Multi-column layouts (newsletters, brochures, etc.) |
| Flexibility | Fixed 50/50 split | Highly customizable column widths and spacing |
| Ease of Use | Extremely easy | Relatively easy |
| Visual Impact | Minimal visual changes | Creates a distinct, visually structured layout. |
No matter your Word proficiency, these two methods empower you to split your documents efficiently, enhancing your workflow and creating more visually compelling content. Remember to choose the method that best suits your specific needs and desired outcome.